IPC (Incident, Problem & Change) Management with OTRS

1. Install OTRS 5 on CentOS 7
Download https://www.otrs.com/download-open-source-help-desk-software-otrs-free/
# rpm -i otrs-5.0.22-01.noarch.rpm

Open following link in browser to run the installer. Replace “otrs.itgratis.com” with your server IP/Hostname
http://otrs.itgratis.com/otrs/installer.pl
Follow the instruction on the screen. You will find below screen for Database.
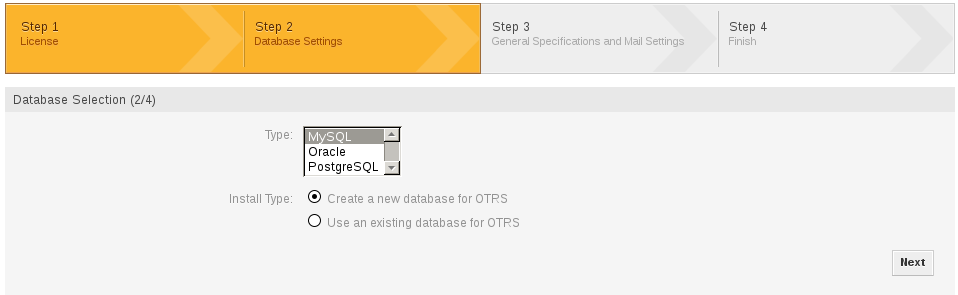
Select MySQL and click Next

Here you need to Install MySQL-Community-Server before you click on Next. You can install Database on the same server or a separate server.
Download https://dev.mysql.com/downloads/repo/yum/
Add MySQL Yum Repository
# rpm -Uvh mysql57-community-release-el7-11.noarch.rpm
Verifying MySQL Repo
# yum repolist
Install & Start MySQL Server
#yum install mysql-community-server
#systemctl start mysqld.service
Find unamename & Password
# grep 'temporary password' /var/log/mysqld.log
Change DB root password
# mysql -uroot -p
mysql> ALTER USER 'root'@'localhost' IDENTIFIED BY 'NEWPASSWORD';
Enter root password on installer screen of OTRS in the browser and click “check database settings”.It may ask for some variable setting in database. Set those values in MYSQL configuration file /etc/my.cnf and restart database
# systemctl restart mysqld.service
Once you will click next on OTRS Installation screen you will see

Setup another database user except root. Don’t forget to note down credentials. click next. You will see finally.

Click Next to start Step-3. Verify FQDN, enter a valid mail address for admin, OrganizationName. You can leave the default values if you don’t have above information. Click Next
This is required to configure mail communication. You can configure this later. Click on “Skip this step
 Now you have URL, username & Password to login on OTRS admin web console. Note these credentials.
Run following commands using “otrs” user
Now you have URL, username & Password to login on OTRS admin web console. Note these credentials.
Run following commands using “otrs” user
$ systemctl restart httpd.service
$ /opt/otrs/bin/otrs.Daemon.pl start
$ /opt/otrs/bin/Cron.sh start
Open link in browser and start as OTRS Administrator.
http://otrs.itgratis.com/otrs/index.pl
Login with username & password you have noted.

2. Let’s Integrate OTRS with LDAP
Make sure that Net::LDAP is installed, if not
# yum install perl-LDAP
Here we have mentioned minimum configuration you need for LDAP Authentication But there are lots of other LDAP parameters which you can use
You can copy LDAP configuration from /opt/otrs/Kernel/Config/Defaults.pm and paste into /opt/otrs/Kernel/Config.pm
Here is the minimum one. So copy below mentioned (Sec. A & B) configuration and paste in to /opt/otrs/Kernel/Config.pm between following as shown in figure below
 Please take few information in Advance from your LDAP Administrator
LDAP Server Hostname/IP & Port. Standard Ports are 389/636. Port 636 is for encrypted connection (recommended).
Base DN - usually refer to main domain.
DN of Username (Service Account) to integrate OTRS and its password
Make sure you change the highlighted values according to your setup.
A. Integrate Agents login interface http://otrs.itgratis.com/otrs/index.pl with LDAP. We will have both Local DB (AuthModule1) & LDAP (AuthModule2) authentication methods for agent login. So that you can create agents locally in OTRS DB who are not the part of LDAP directory but you need those agents to support services.
$Self->{AuthModule1} = 'Kernel::System::Auth::DB';
$Self->{AuthModule2} = 'Kernel::System::Auth::LDAP';
$Self->{'AuthModule::LDAP::Host2'} = 'ldap.itgratis.com:636';
$Self->{'AuthModule::LDAP::BaseDN2'} = 'dc=itgratis,dc=com';
# Below value should be 'uid' if you have Linux based LDAP like OpenLDAP. Here we have used 'sAMAccountName' for Active Directory.
$Self->{'AuthModule::LDAP::UID2'} = 'sAMAccountName';
$Self->{'AuthModule::LDAP::SearchUserDN2'} = 'cn=otrsusr,ou=ServiceAccounts,dc=itgratis,dc=com';
$Self->{'AuthModule::LDAP::SearchUserPw2'} = 'password';
B. Integrate Customer Login Interface http://otrs.itgratis.com/otrs/customer.pl with LDAP. Customer will use this portal to create incident tickets when they need support.
$Self->{'Customer::AuthModule'} = 'Kernel::System::CustomerAuth::LDAP';
$Self->{'Customer::AuthModule::LDAP::Host'} = 'ldap.itgratis.com:636';
$Self->{'Customer::AuthModule::LDAP::BaseDN'} = 'dc=itgratis,dc=com';
# Below value should be 'uid' if you have Linux based LDAP like OpenLDAP. Here we have used 'sAMAccountName' for Active Directory.
$Self->{'Customer::AuthModule::LDAP::UID'} = 'sAMAccountName';
$Self->{'Customer::AuthModule::LDAP::SearchUserDN'} = 'cn=otrsusr,ou=ServiceAccounts,dc=itgratis,dc=com';
$Self->{'Customer::AuthModule::LDAP::SearchUserPw'} = 'password';
# CustomerUser
$Self->{CustomerUser} = {
Name => 'LDAP Backend',
Module => 'Kernel::System::CustomerUser::LDAP',
Params => {
Host => 'ldap.itgratis.com:636',
BaseDN => 'dc=itgratis,dc=com',
SSCOPE => 'sub',
UserDN => 'cn=otrsusr,ou=ServiceAccounts,dc=itgratis,dc=com',
UserPw => 'password',
},
# Below value should be 'uid' if you have Linux based LDAP like OpenLDAP. Here we have used 'sAMAccountName' for Active Directory.
CustomerKey => 'sAMAccountName',
CustomerID => 'mail',
Map => [
[ 'UserFirstname', 'Firstname', 'givenname', 1, 1, 'var', '', 0 ],
[ 'UserLastname', 'Lastname', 'sn', 1, 1, 'var', '', 0 ],
[ 'UserLogin', 'Username', 'sAMAccountName', 1, 1, 'var', '', 0 ],
[ 'UserEmail', 'Email', 'mail', 1, 1, 'var', '', 0 ],
[ 'UserCustomerID', 'CustomerID', 'mail', 0, 1, 'var', '', 0 ],
],
};
Save Config.pm. and restart OTRS using “otrs” user
$/opt/otrs/bin/otrs.Daemon.pl stop
$/opt/otrs/bin/otrs.Daemon.pl start
Open Agent & Customer web Interfaces and try to login with any LDAP user. Can you create ticket using customer portal?
When you will try to login to Agent interface using a LDAP user, you will get following error
Authentication succeeded, but no user data record is found in the database. Please contact the administrator.
So first login using root@localhost and add a ldap user as a agent using Agent management under “Admin” Section (See below figure). After adding agent, logout and login again using LDAP user which you have added as agent. Now you are ready to configure OTRS according to your organization’s incident, Problem & Change Management Processes.


- Get link
- X
- Other Apps
- Get link
- X
- Other Apps
Comments
Post a Comment